Docker is a tool I often use, both for developing personal projects and also during my Cybersec studies. Recently, I researched how Docker builds an image and discovered ways to limit the image size.
This came after I set up a separate, basic VPS for testing stuff that quickly ran out of storage. Instead of simply upgrading the VPS storage, I went for frugality and optimized my Docker images.
Here are some basic first steps you can take to limit the image size. I tried keeping these steps language agnostic, but I’ll use a Node app to exemplify the concepts.
The build command I used:
docker build --no-cache -t node-api:v0 .
After each step, you’ll see the image size and build time. Notice that the build time may vary based on your system, network connection, time of day, and how depressed your machine is.
Initial build
I’m starting from this Dockerfile:
FROM node:latest

WORKDIR /usr/src/node-api

COPY package*.json ./
RUN npm install --verbose

COPY . .

RUN npm run build

CMD ["npm", "start"]
Size:
node-api     v0        1.43GB
Time
Building 17.2s (12/12)
Steps
1. Ignore files
With .dockerignore. Placed in the root directory.
This speeds up the build and also prevents sensitive files from showing up in the final image.
Here are some more details on syntax.
Size:
node-api     v1        1.37GB
Time:
Building 15.3s (12/12)
2. Base Image
This has a major impact on the size of the final image.
The main frameworks offer different image tags to use. Go for the leaner images, as you can save on storage, but this may come with a caveat.
For Node, use alpine images instead of latest.
Alpine-based images are popular for their minimal size and smaller vulnerability count. They are not officially supported by the Node team though. See the list of unofficial Node builds.
Alpine project uses musl to implement the C standard library, whereas Debian’s Node.js tags (for instance bullseye or slim) rely on the glibc. For this reason, it might cause compatibility issues with dependencies that include native code.
However, alpine will suffice for most projects.
I downloaded some common Node image tags to compare them:
REPOSITORY               TAG               SIZE
node                     latest            1.13GB
node                     bookworm          1.13GB
node                     bullseye          1.03GB
node                     slim              230MB
node                     alpine            165MB
Additionally, you can use distroless base images. They contain only your app with its runtime dependencies. The package managers, shells, and others are skipped. Using them dramatically decreases the image size and its attack surface.
This approach is more advanced and out of the scope of this article.
Size:
node-api     v2        408MB
Time:
Building 17.1s (12/12)
3. Multi-stage build
This allows you to separate the build and runtime envs. You can include only the essential files in the final image.
A Dockerfile accepts multiple FROM statements. Each FROM instruction begins a new stage of the build (and can use a different base image). And each stage can be named with the AS keyword.
Here is my updated Dockerfile:
# Build stage
FROM node:alpine AS build
WORKDIR /usr/src/node-api
COPY package*.json ./
RUN npm install --verbose
COPY . .
RUN npm run build

# Prod stage
FROM node:alpine
WORKDIR /usr/src/node-api
COPY --from=build /usr/src/node-api/build ./build
COPY package*.json ./
RUN npm install --verbose

CMD ["npm", "start"]
You can stop the build at a specific stage using the --target flag:
docker build --target build -t node-api:v3 .
Size:
node-api     v3        234MB
Time:
Building 8.6s (15/15)
4. Skip dev dependencies
Besides multi-stage, you can further skip dev dependencies during install.
For Node, always use ci (clean install) instead of i. This command is more efficient and installs the exact versions based on package-lock.json. It throws an error and exits for any version mismatch. It also accepts an --omit flag to skip some dependencies.
RUN npm ci --omit=dev
Size:
node-api     v4        172MB
Time:
Building 6.3s (16/16)
5. Merge layers and cleanup between them
We can clean the temporary files that are created after a RUN instruction. It is common for package managers to install additional components and keep a local cache. We can save space by:
- Instructing the package manager to install the minimum dependencies
- Remove the cache after installation, or instruct the package manager to disable the cache altogether
For example, after installing Node dependencies, npm creates metadata files that take up space in the image. We can use these commands to remove them:
RUN npm cache clean --force
RUN rm -rf /tmp/* /var/cache/apk/*
For Debian/Ubuntu use --no-install-recomends. It keeps the cache at /var/lib/apt/lists:
RUN apt-get install -y --no-install-recomends
RUN apt-get clean
RUN rm -rf /var/lib/apt/lists/*
For Python (pip), we can specify the same with --no-cache-dir.
Limit the number of layers
Every instruction in a Dockerfile creates a new layer in the image. Docker utilizes an overlay-type file system, stacking these layers cumulatively.
In the above examples, even if we instruct to delete the files, they are not deleted and the image size will not decrease, so the disk space will not be returned.
We can merge the RUN commands to avoid this.
If we do the cleanup before the RUN command is completed, the files we want deleted will not end up in the image:
RUN npm ci --omit=dev && \
    npm cache clean --force && \
    rm -rf /tmp/* /var/cache/apk/*
Size:
node-api     v5        170MB
Time:
Building 6.7s (16/16)
Summary
 And my final Dockerfile:
# Build stage
FROM node:alpine AS build
WORKDIR /usr/src/node-api
COPY package*.json ./
RUN npm ci && \
    npm cache clean --force && \
    rm -rf /tmp/* /var/cache/apk/*i
COPY tsconfig.json ./
COPY src ./src
RUN npm run build

# Prod stage
FROM node:alpine
WORKDIR /usr/src/node-api
COPY --from=build /usr/src/node-api/build ./build
COPY package*.json ./
RUN npm ci --omit=dev && \
    npm cache clean --force && \
    rm -rf /tmp/* /var/cache/apk/*


CMD ["npm", "start"]
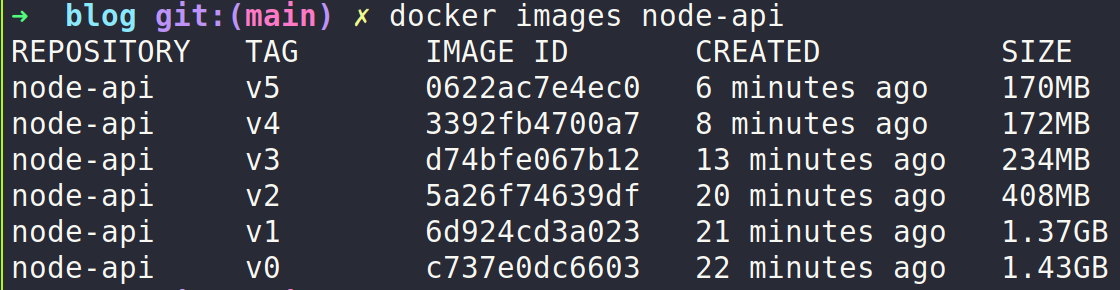
Measuring image sizes
You can get the image size by listing the images:
docker images node-api
For more advanced insight, a useful tool is dive:
dive node-api
It offers TUI for interactively exploring a Docker image. You can see each layer in detail, check for wasted space, and identify where you can further optimize. It breaks down each layer including which files were added their size.
Alternatively, I found out you can just create the image without running it. Then, you can export its contents and inspect them manually:
docker create node-api:v5
docker container list -a
docker export <CONTAINER_NAME> > node-api.tar
Or:
docker export $(docker create node-api:v5) > node-api.tar